
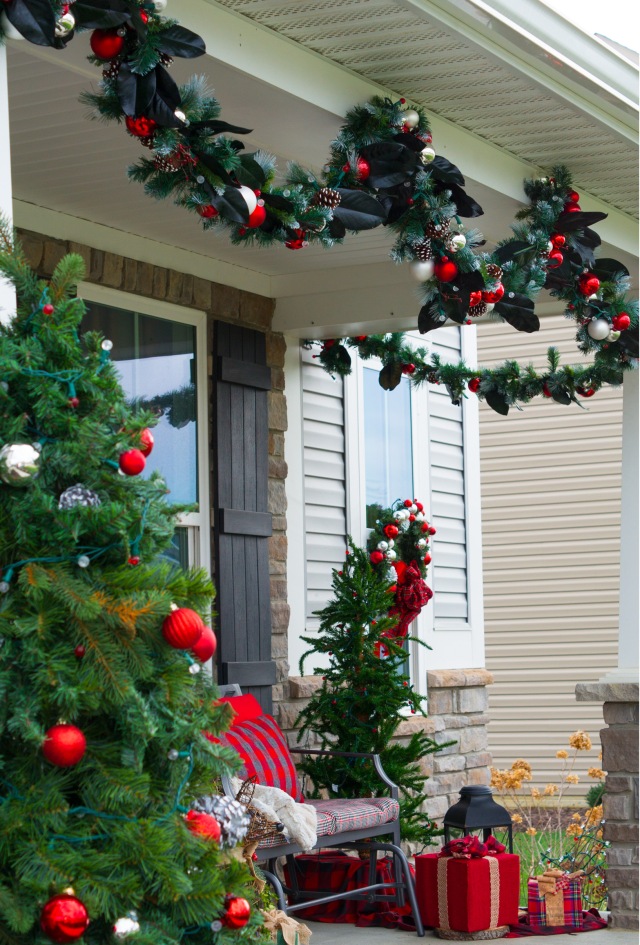
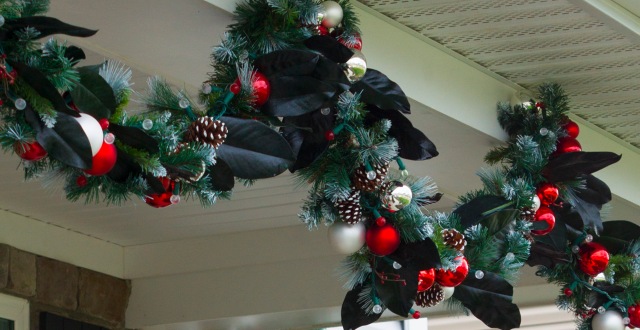
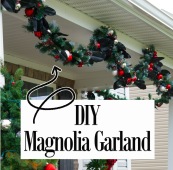
Hi friends! As promised, I am going to post on how I made the new outdoor Christmas decorations. Of the projects this year, my favorite was making the magnolia garland. So lets start with that one.
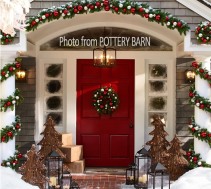
My inspiration came from an old Pottery Barn photo of a house draped with an ornament filled garland. If you have been on Pinterest you’ve probably seen it. It’s been pinned like a gazillion times. It’s a beautiful photo. I liked the bright silver and red colors, a classic and gorgeous look.
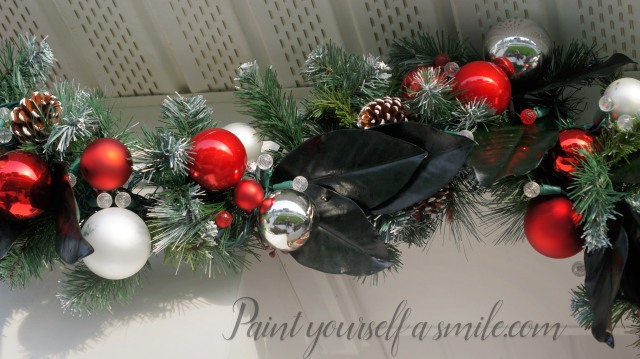
At the same time, what I really wanted was a magnolia garland. I wasn’t sure what direction to go in so I decided the best of both worlds was the way to go! And I am so glad I threw it all in because I love the final look. After all, you know what they say, “more is more”. Oh wait nobody says that. But “they” should say that because who really wants less when you can have more? Ha. Anyway, putting together this garland is fairly straight forward. Here is what I used….
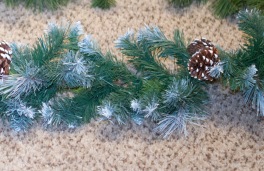
- Artificial Garland
- Lights
- Magnolia Leaves
- Some red berry stuff that I found in my basement and wanted to get rid of. (You don’t need this though. I would skip it if I didn’t already own buckets of it.)
- Craft/Floral Wire 22 or 30 gauge works well. (sold in the floral section)
- Floral Picks (optional)
- Floral Tape (optional)
- Hot Glue
- Green Zip Ties
- Red & White Lights or Just White
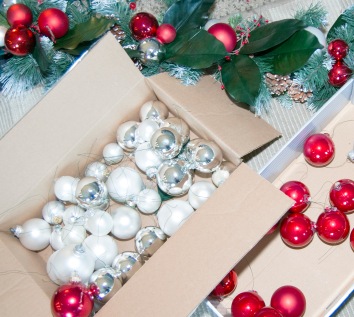
- A boat load of shiny and matte ball ornaments in Red, silver and white. I used a combination of sizes. From large to small. I tried to count when it was all up but that wasn’t so easy. Here is my approximate. for 30 feet it was about
- 16 Large Shiny Red
- 12 Small-Med. Shiny Red
- 8 Large Matte Red
- 8 Small-Med. Matte Red
- 6 Large Silver
- 5 Small Silver
- 8 Large White
- 5 Small White
GATHERING THE SUPPLIES
-I ordered a box of magnolia leaves off Amazon.
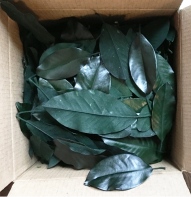
It was 30 some dollars but I ordered a large box because I planned on getting a big supply for future projects. Sure enough there were enough leaves in the box to do garlands for my whole street. You’ve got to love Amazon. After this project was all said and done I still had a full box.
-I purchased some great garland on sale at my local craft store. (4) 9 foot pieces for 7 dollars each. SCORE!
-I gathered up all the red, silver and white ornaments I had in my hoarder basement and then bought several more boxes on sale. I think I spent another 40 dollars, but I got a lot. You are going to need a lot. If you plan on making this, start collecting sale ornaments now. For me, I already started with quite a bit because I have bought up extra ornaments after Christmas when they start to get clearanced out. (Seriously, be on the lookout for glass and plastic balls in the after-Christmas clearances. They can be used in so many projects and decorations. Those and pine cones)
PREPPING THE MATERIALS …
I started by wiring my magnolia leaves. I used the floral tape and wrapped the pick and stem together. There is a wire pre-attached to the pick. You want to make sure that wire in not wrapped with the floral tape because you will use that wire to secure your magnolia leaves to your garland.
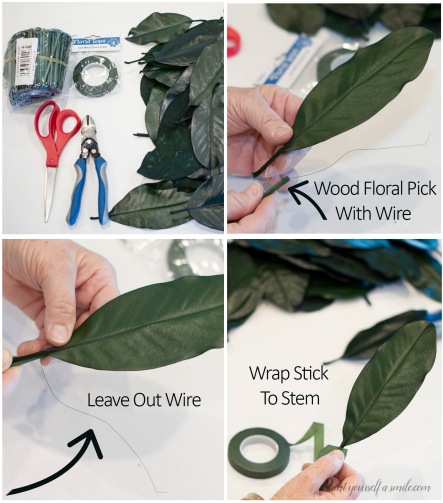
(Thanks Mom for helping me and letting me photo you)
If you want to skip the pick you could just attach a wire directly to the stem. Depending on the weather in your area, you may be able to just tuck your leaves in without any wiring. I live near Lake Erie and it gets very windy. I have to secure my ornaments and leaves with wire, otherwise pieces of my garland would be blowing into my neighbor’s yard. You could try to just hot glue your pieces, but again pieces could come loose. I personally feel that if I am going to take time to make it, I am going to do it the best I can so it lasts.

Once the leaves were all pre-wired, I started on preparing my ornaments.
I added a wire and reinforced the ornament tops with hot glue. You could skip the hot glue if you are feeling adventurous and your ornaments are shatter proof. My good friend and neighbor Abby from twistmepretty.com made one and she didn’t do the hot glue. But I glued away because I am the queen of over kill.
I had ornaments everywhere! Poor Big Chewy, he couldn’t find a clear spot to lay

 Before you wire & glue your ornaments, lay your garland out on the floor and temporarily place your ornaments down on the garland. This will give you an idea of your design and how many ornaments to wire and reinforce with hot glue.
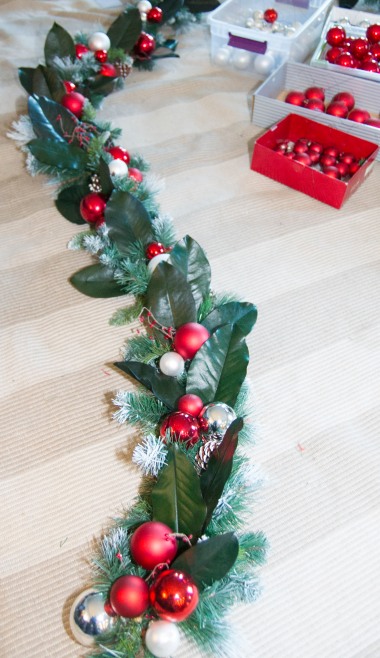
BUILDING THE GARLAND…
I laid my garland on the floor and began by simply placing the leaves down where I thought I would like. I groups two leaves together and left a space then grouped three leaves together. I alternated groups of two and three.
Once I liked the pattern, I started at one end and went down the row securing each item with the pre-attached wire. I did the Same thing with the ornaments. I made little groups and made sure that the red was the dominating color and used the white and silver sparingly.
(Please ignore the grimy carpet. I laid that down so I didn’t destroy the family room carpet while I worked)
It is pretty simple; it just takes a little time when you are doing 30 feet. So go get some hot chocolate and put on a Christmas movie. It makes the process more fun.
Now that the leaves and ornaments were all secure, I began to place my light string in the garland. and secured it with green zip ties. I cut the extra off of the zip ties as I go. I chose to do the lights last because I didn’t want the bulbs to get buried by all the decorations and leaves. I wanted my garland nice and bright at night
 We make our own red and white lights. We get 3 boxes of Philips warm white sphere lights and one box of red. Target carries them. Them we pull out the bulbs in the red string. We plug in the white string and pull every 4th white light and replace it with a red bulb. So the pattern is one red, three white, one red and so forth. YOU NEED TO KEEP THE STRING PLUGED IN AND DO IT ONE BULB AT A TIME. Sometimes the bubs don’t connect right and you don’t want to get it all done and then have to go back and find the short.
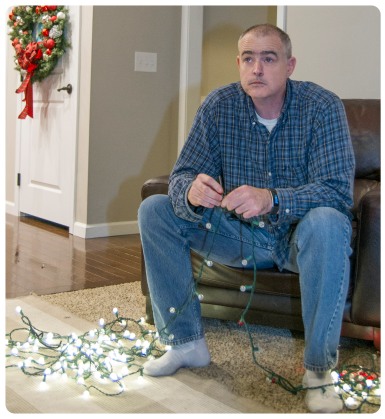
This is my Hubby watching hockey and making me light strings of my desired color combination. I love that man!
Now you are all done and it is ready to hang.
Because of all the stuff in this garland it was slightly heavy. The weight of all the goodies caused it to hang and look a little different than it did on the floor. If yours is going to swag open like mine, there is no way around it. I would save some magnolia leaves and after it is up add them back in where it looks like it could use them. That is what I did. It was fairly quick to make the adjustments after it was up and I saw the effect gravity had on it in some spots.
There you have it – one very expensive looking garland for a fraction of what you would pay for it if you bought the same thing pre-made. Seriously, Abby and I looked and the prices were CRAZY!
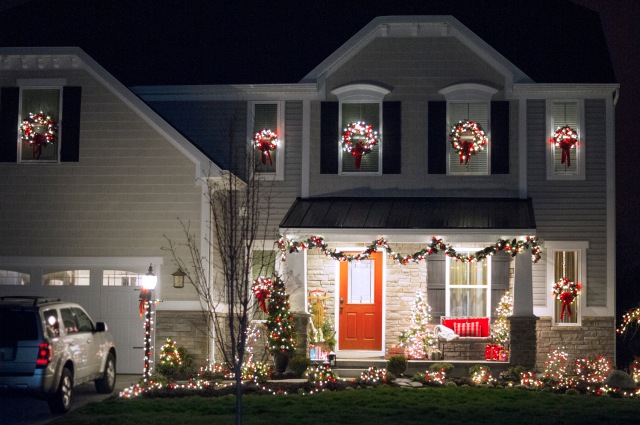
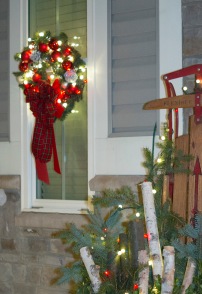
Come back tomorrow and I will show you how to do make and hang all those lighted wreaths! (here)
Happy Creating and Merry Christmas!

Leave me a comment, I would love to hear from you.
I’m Linking to …
http://www.tipjunkie.com/ – The Pin Junkie – savvy southern style – Cozy Little House – A Stroll Thru Life – Diy By Design – Wear Flowers In Your Hair

Wow, this is stunning! I really admire people who take the time and care to make beautiful Christmas decorations like this!!
LikeLike
Thank you so much Michelle!
LikeLike
Gorgeous. Your home is stunning and the garland is beautiful.
LikeLike
Marty, Thank you so much for hosting the link party and the very kind words. My heart is full. Thank you. Much Love, Jenny
LikeLike
So so beautiful!
LikeLike
Thank You Mary
LikeLike
Pingback: DIY Christmas Window Wreaths | Paint Yourself a smile
Simply Beautiful! I love the garland and the nighttime view is spectacular. Happy Holidays!
LikeLike
Thank you so Much MeMe! Merry Christmas, Jenny
LikeLike
This is gorgeous! I may do this for next year as I have wanted to do a garland out front since we moved here (3 years ago). Merry Christmas!!! Came over from Marty’s feature:)
LikeLike
Thank you
LikeLike